Getting Started
This guide will take you through the steps to set up the Mr.Albert POR product for your team or organization.
-
If you are not already a Mr.Albert user, start by signing up at https://mralbert.in. We will get back to you and guide you on setting up your account.
-
If you are already using Mr.Albert and want to add/enable the POR product for your account, send us a mail at alex@mralbert.in
Let's get started.
1. Create Users
The first step is to add users who will have access to your Mr.Albert POR account. There are multiple levels of user accounts (admins, approvers, creators) with varying permissions - perfect to achieve access control rules.
Currently, to add new users, please let us know via email and we will set up the new users for your account.
If you already have a Mr.Albert account, users already added to that account will be available within the POR product as well.
2. Create Budgets
Budgets in Mr.Albert POR product are a simple but effective way to maintain a realtime watch on various expense categories. Budgets need not be the same as the detailed Chart of Accounts used by the Accounting team. Instead, it can be a simpler set of easy-to-understand and easy-to-manage expense categories. The simplified approach makes it easy for non-financial personnel like engineers, designers and salespeople to create and manage Purchase Orders by themselves.
All Purchase Order Requests need to be filed under any one budget. Selecting the budget is a mandatory field while creating a POR. A budget needs to be created by following the steps below before a POR can be created under that budget.
To create a budget:
- Navigate to the "Budgets" tab in the Mr.Albert POR interface.
- Click "Create Budget"
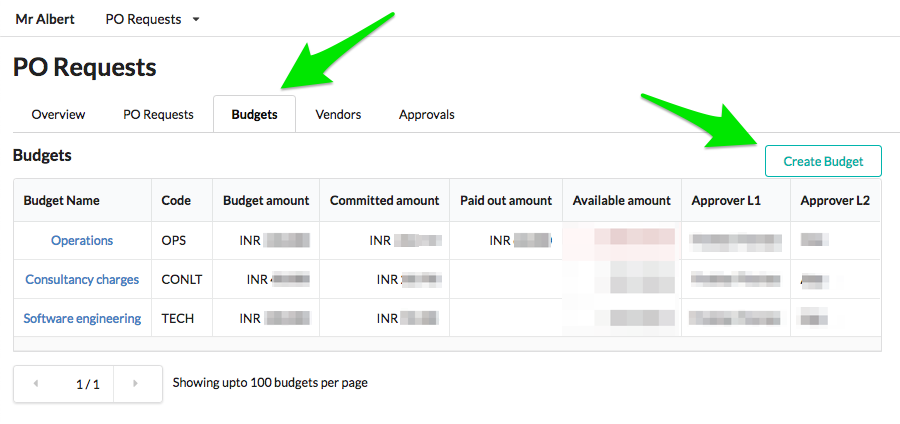
- Enter a Code and Name for the budget, set the budget amount, and select L1 and L2 approvers from the drop-down list.
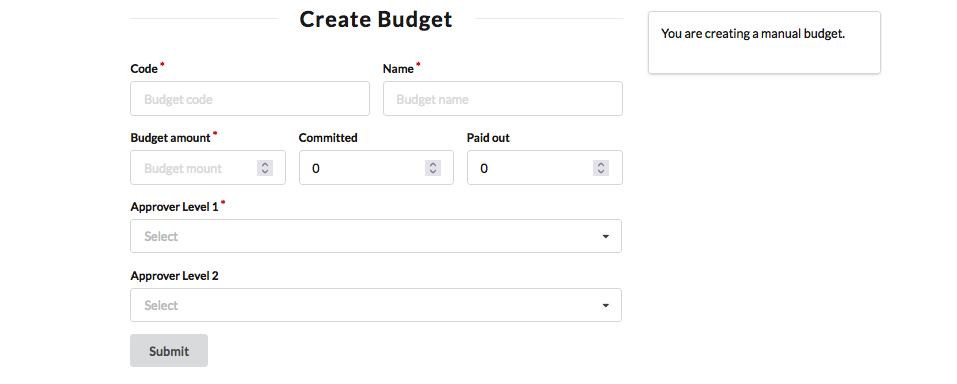
- The drop-down list will be showing users created in Step 1 above. If new users need to be added, repeat Step 1.
- It is possible to have just one approver - L1. Leave the L2 Approver field blank in such cases.
- Click "Submit". The new budget will now be created and should be visible in the Budgets tab.
Tip: For detailed information on Budgets including details of all available fields in the "Create Budget" page, please read the reference article: Create or Edit a Budget
3. Create Vendors
A Vendor in Mr.Albert POR product is an entity to whom a Purchase Order is being initiated. Vendors can be individuals or businesses supplying goods and/or services to your company.
"Vendor" is another mandatory field to be filled while creating a POR. Similar to the case with budgets, the list of vendors added in this step will be displayed in a drop-down list while creating a POR. A new vendor needs to be created by following the steps below before a POR can be created with that vendor.
To create a vendor:
- Navigate to the "Vendors" tab in the Mr.Albert POR interface.
- Click "Create Vendor"
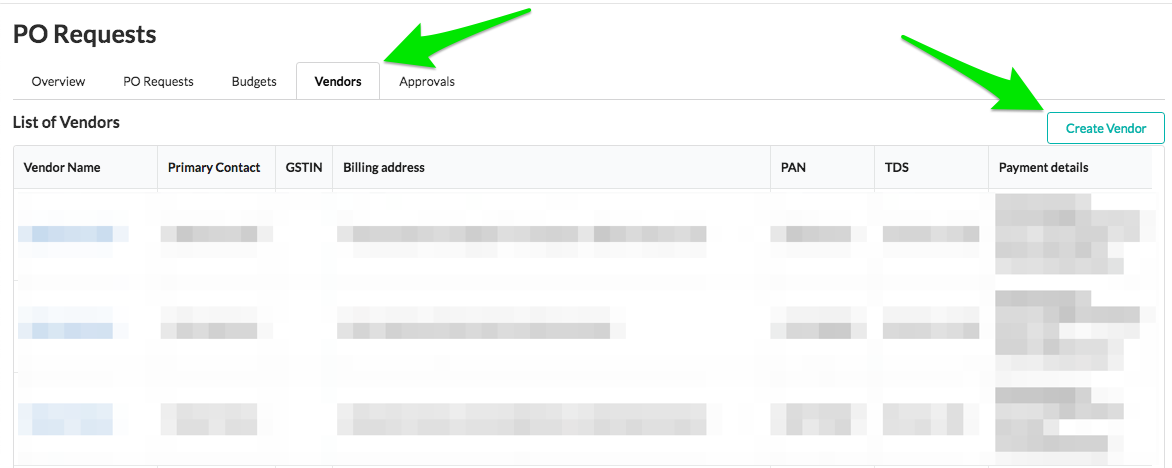
- Enter the details of the vendor.
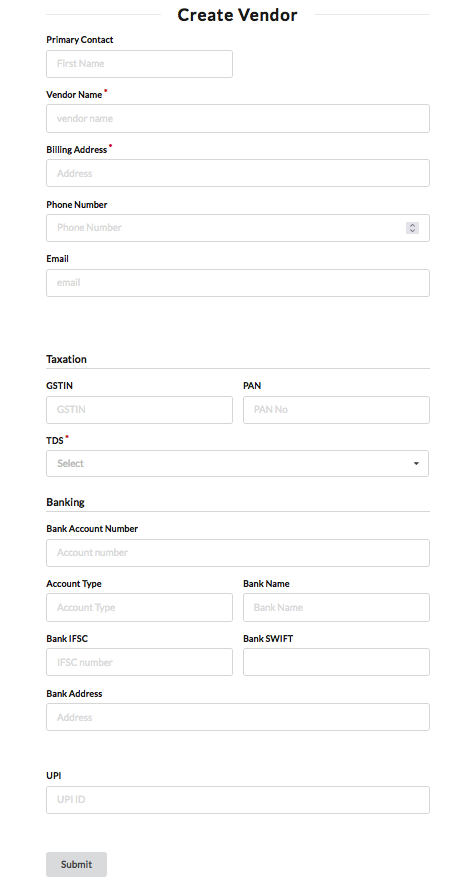
- Under the "Banking" section in the "Create Vendor" page, enter either bank account details of the vendor or their UPI address, but not both.
- Click "Submit". The new vendor will now be created and will be visible in the table in the Vendors tab.
Tip: For detailed information on Vendors including details of all available fields in the "Create Vendor" page and important things to note while managing Vendors, please read the reference article: Create or Edit a Vendor
4. Set up Payout integration
Mr.Albert POR product offers the option to issue payouts to Vendors (against approved Purchase Order Requests), from within the Mr.Albert POR interface. To be able to do this, your payment processor account (eg. RazorpayX) needs to be connected to your Mr.Albert POR account.
To set up payout integration,
- Go to your Organization's Settings by hovering over your Organization's name at the right end of the navigation bar at the top, and click "Settings"
- Click on "Integrations" in the menu on the left.
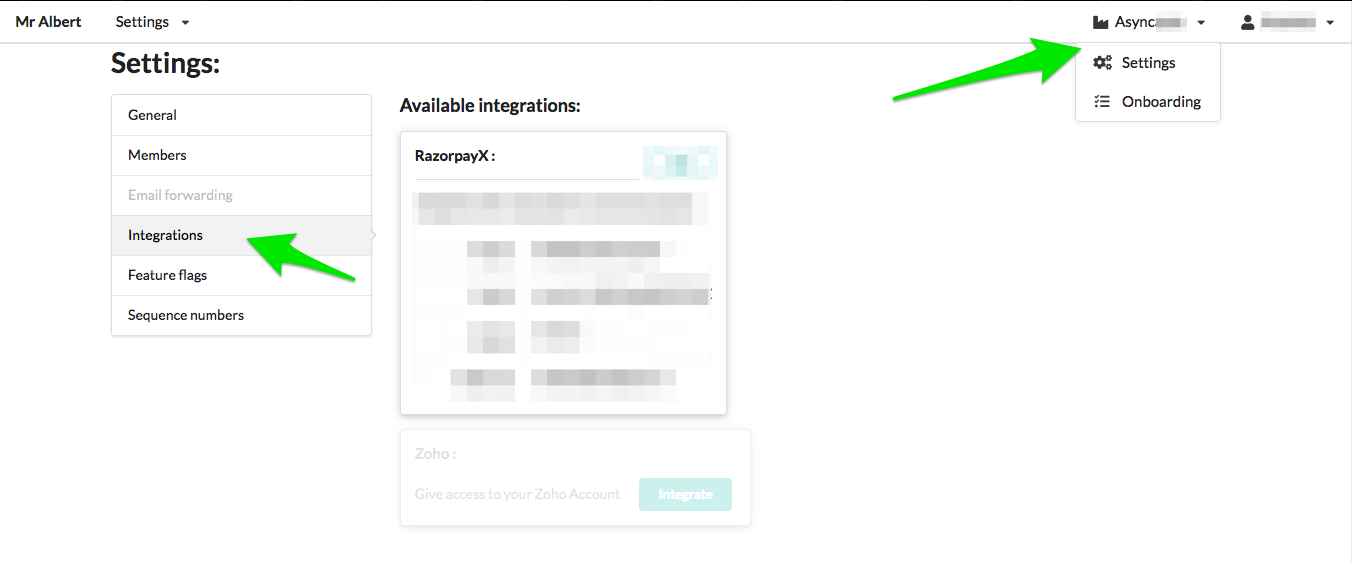
- Click on "Integrate" in the RazorpayX tile.
- Enter your RazorpayX Org id, Key id, Secret and Bank account number.
(For help with finding or generating these details, check this RazorpayX reference article.)
- Click "Submit".
5. Create the first POR
A Purchase Order Request is an entry created by a user of the Organization requesting approval to purchase goods and/or services from external entities - Vendors. A Purchase Order Request should:
- be filed under a suitable budget
- be addressed to a single vendor
- contain details of the item(s) to be purchased
- contain payment terms and the required payment mode
With user accounts added, budgets set up and vendors added, you are now ready to create the first POR.
To create a POR:
- Navigate to the "PO Requests" tab in the Mr.Albert POR interface.
- Click "Create POR"
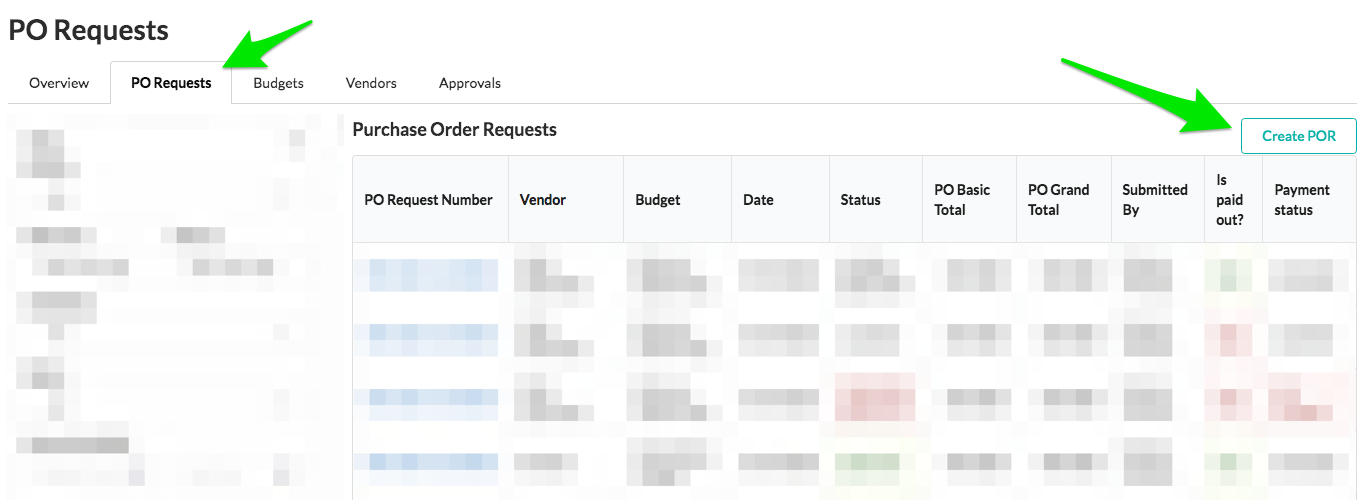
- Fill in the details for the POR.
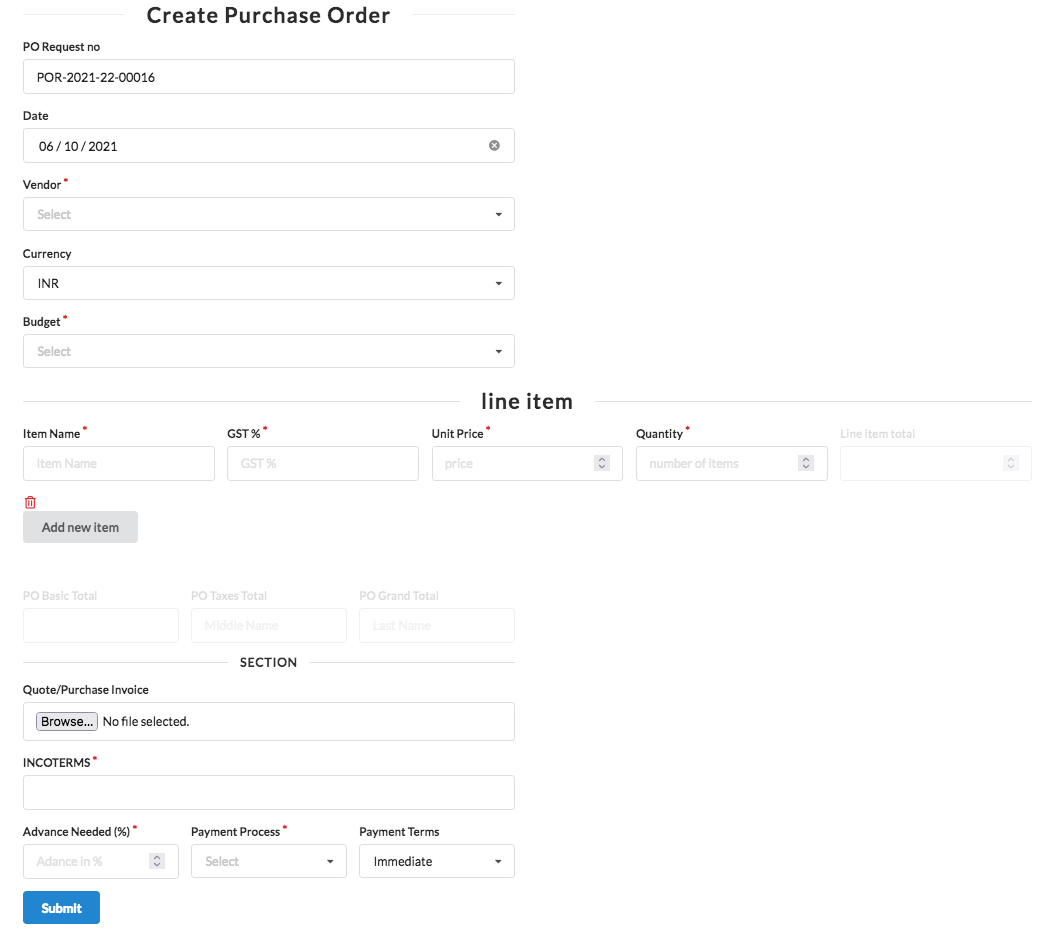
Tip: For detailed information on all the fields in the Create POR page, read the reference article: Create or Edit a POR
- Click "Submit". The newly created POR will be visible in the table in the PO Requests tab.
- An automated email notification is sent to all admins and approvers whenever a new POR is created.
6. Approve the POR
All PORs need to the pass through an approval process, in which the POR may either be approved or rejected by the approver(s) of the budget under which the POR is filed. By default, there are two levels of approval - L1 and L2. The number of approval levels can be changed based on administrative requirements.
To approve a POR:
Ensure that the account you are logged in to is set as the L1 Approver (or L2 Approver, as the case may be) for the budget under which you created the POR in Step 4 above.
- Navigate to the "Approvals" tab in the Mr.Albert POR interface.
- By default, you will be shown the "Pending on me" view which lists all PORs pending approval from you - the L1 or L2 Approver.
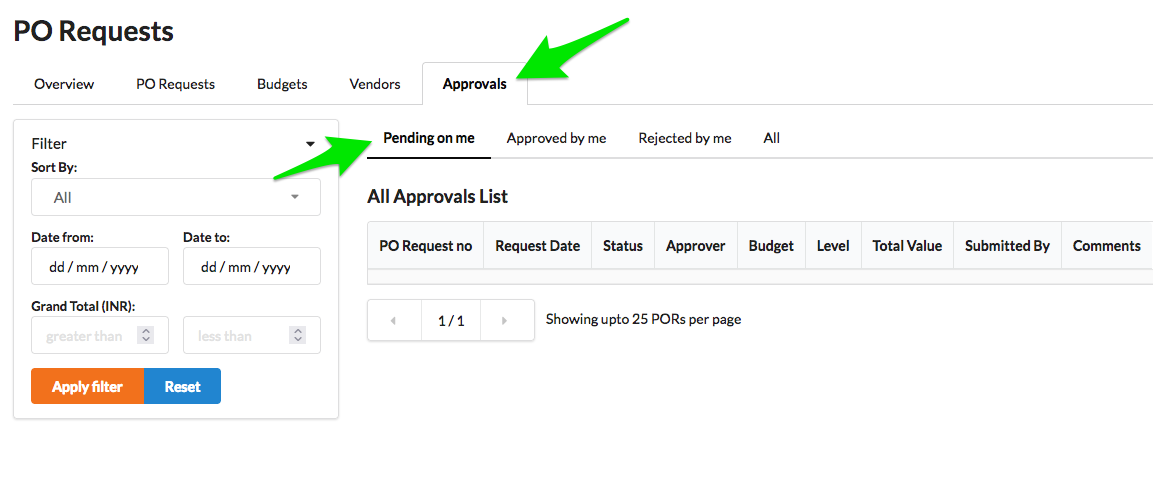
- In the table that lists pending PORs, click on the "pending" link under the "Status" column of the particular POR.
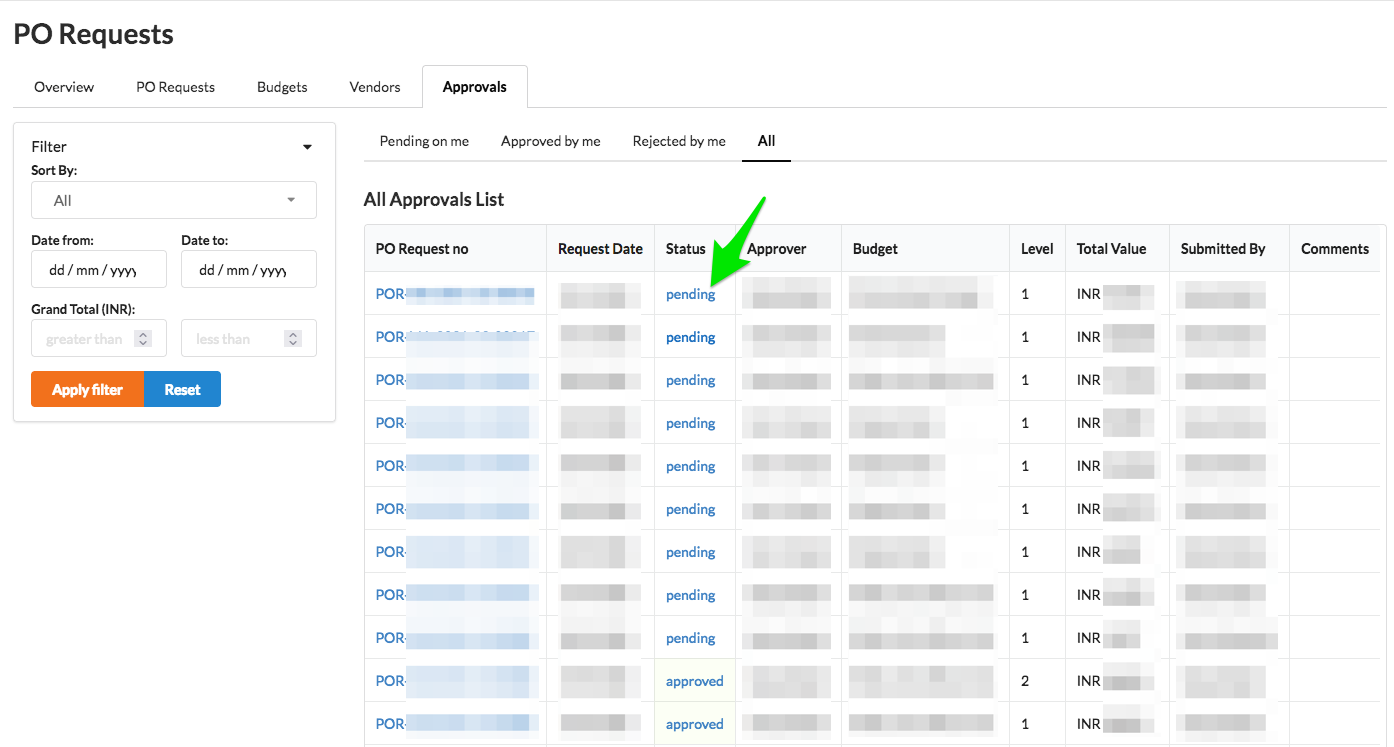
- Check the details and scroll to the bottom of the page to find the "Approve" or "Reject" buttons. To approve the POR, click "Approve".

- The POR will now be marked as approved by you - L1 or L2 Approver as the case may be.
- If you are the L1 Approver, the L2 Approver will need to follow the same steps detailed above to give L2 approval to the POR.
- If you are the L2 Approver, the approval process is now complete and you may proceed to payout as needed.
- If there is only one level of approval, the approval process will be complete when the POR is given L1 Approval.
Tip: For detailed information on all available options related to Approvals, read the reference article: Approve a POR and Reject a POR
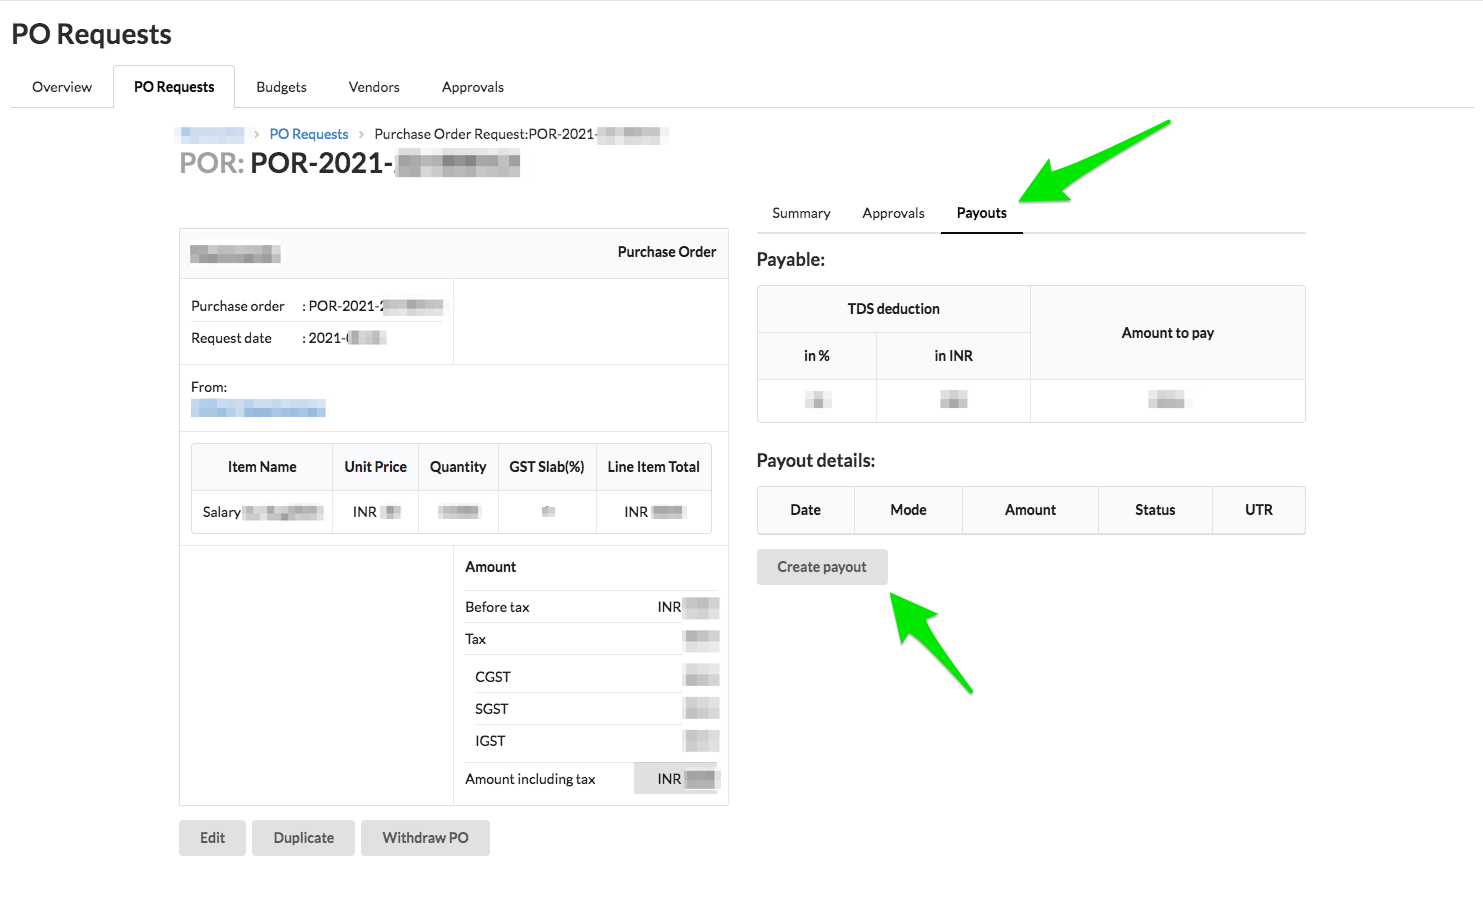
7. Issue Payout
Payout is the final stage of the POR workflow. For approved PORs, payouts can be issued from within the Mr.Albert POR interface. Once issued, payouts will be automatically made from your company's RazorpayX account (or other payment processor accounts) integrated to the Mr.Albert POR account.
To issue a payout:
- From the "PO Requests" tab (or from anywhere else you find the clickable "PO Request no"s of the PORs - eg. in the Approvals tab, Budget detail page etc.), click on the "PO Request no" of the POR for which you want to issue the payout.

- In the POR detail page that loads, switch to the "Payouts" tab shown to the right side of the POR details.
- Verify the amounts and click "Create payout". This will trigger an outward payment from the RazorpayX account connected to your Mr.Albert POR account.
- After triggering the payment, reload the page and click the "refresh" icon in the table under "Payout details" to update the status of the payout transaction.
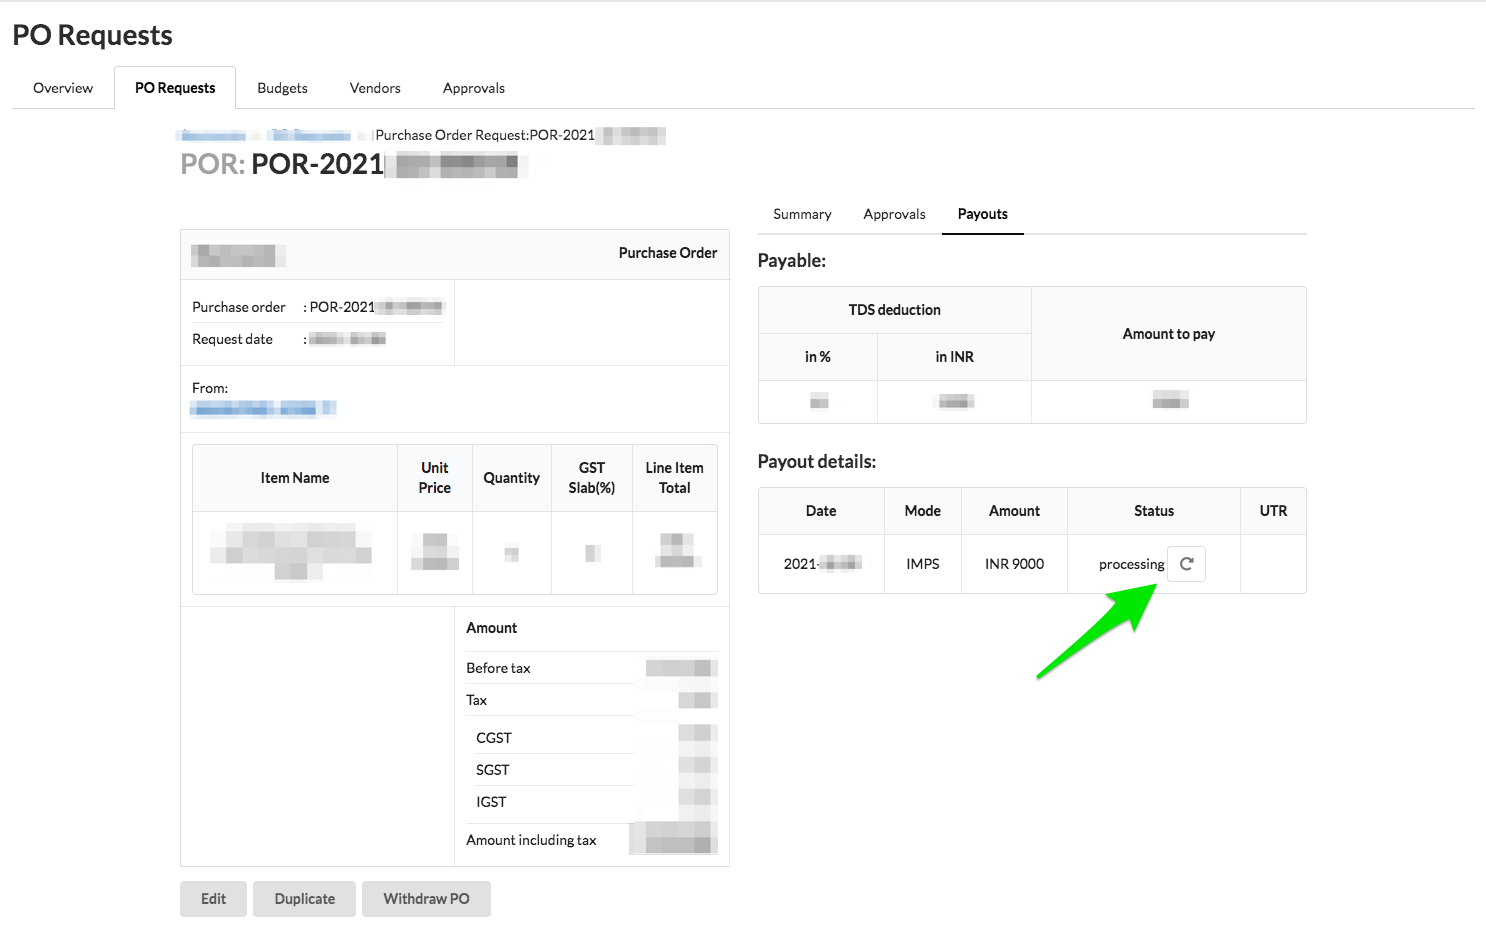
- UTR number of successful transactions will be displayed in the table along with the other details.

Tip: For detailed information on all available options related to Payouts, read the reference article: Issue a Payout
That's it, you have completed setting up Mr.Albert POR and also explored one complete journey of a POR - from creation through approval to payout.
Based on integrations set up in your account, the Purchase Orders will be synced to your Zoho Books account.
To keep learning about Mr.Albert POR, check out our Guides and Reference articles.